
Email marketing is one of the most effective and widely used marketing channels for businesses of all sizes. It allows businesses to reach their audience directly and build meaningful relationships with their subscribers.
However, with the increasing volume of emails in our inboxes, it’s becoming more challenging to capture the attention of subscribers and stand out from the crowd. One effective way to improve the effectiveness of your email marketing campaigns and to get better results is through personalization.
Personalization in email marketing involves tailoring your email content to meet the individual needs and preferences of your subscribers. This can include everything from using their first name in the email template to recommending products based on their past purchases. A personal touch would go a long way in increasing the engagement of your email campaign.
Inserting the first name of subscribers using the first name tag in your email marketing campaigns and welcome emails is a simple yet powerful way to personalize your emails and increase engagement. When subscribers see their name in the email, it creates a sense of familiarity and connection, which can lead to better open and click-through rates. That’s why adding the subscriber’s name into your email campaign is of utmost importance in increasing the engagement of your email marketing campaigns.
Mailchimp is a great tool for email marketing. Although there are many blog posts that cover this topic, In this most comprehensive and detailed blog post, we will show you how to insert first name in Mailchimp emails using merge tags. We will walk you through the process of creating merge tags, inserting them in your email content and subject lines, and testing and previewing your merge tags to ensure that they work correctly. We will also provide tips and best practices for using merge tags effectively to personalize your Mailchimp campaign and increase engagement. So let’s get started!
Understanding Merge Tags
Before we dive into the specifics of inserting the first name of subscribers in Mailchimp emails, it’s important to first understand what merge tags are and how they work.
In Mailchimp, merge tags are placeholders that you can use to dynamically insert subscriber information into your Mailchimp template. They allow you to personalize your emails by adding subscriber-specific information, such as their name, email address, location, physical mailing address and more.
Merge tags consist of two parts: the merge tag name and the merge tag content. The merge tag name is enclosed in asterisks (*), and it tells Mailchimp which subscriber information to pull from your audience list. The merge tag content is the text that will be displayed in your Mailchimp email campaign.
For example, to insert the first name into your Mailchimp template, you would use the merge tag |FNAME|. Mailchimp will replace this merge tag with the first name of each subscriber when the email is sent.
It’s important to note that merge tags are case sensitive, so make sure that you use the correct capitalization when creating merge tags. Additionally, merge tags will only display subscriber information if it is available in your audience list. If a subscriber’s first name is missing from your mailing list, for example, the merge tag will be left blank in the email campaign.
Now that we have a basic understanding of merge tags, let’s dive into how to create and use audience merge tags to insert the first name of subscribers in Mailchimp emails.
Creating Merge Tags in Mailchimp
Mailchimp merge tags will greatly help you in personalizing your email campaign. Creating audience merge tags in Mailchimp is a straightforward process. Use the following steps to create a merge tag for the first name of subscribers:
- The first step is to Log in to your Mailchimp account and navigate to the Audience tab.
- Click on the Audience Dashboard and select the audience list that you want to work with.
- Click on Manage Audience and select the Settings option.

- Click on Audience fields and *|MERGE|* tags
- Scroll down to the Merge Tags section and click on Add A Field.
- Select a field type to add. In this case “Text”
- Enter the merge tag name in the Field Tag box. For the first name, use FNAME.
- Customize the default text that will appear if a subscriber’s first name is not available (for example, you can set the default value as “Hi there” or “Dear valued client”).
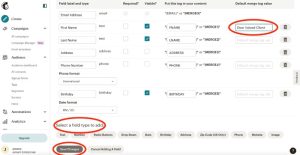
- Click on Save Changes.
Congratulations! You have just created a audience merge tag for the first name of subscribers in your Mailchimp audience list. Please note, Mailchimp already has pre-defined merge tags for first name, last name, subscriber’s email address, mailing address, phone number and birthday. Although these are pre-defined, this article shows you how to create a new merge tag.
You may use the above steps to create any additional merge tags that you may require.
It’s important to note that merge tags are unique to each audience list in Mailchimp. If you have multiple mailing lists, you will need to create separate merge tags for each list.
Now that you have created your merge tags, let’s explore how to insert them into your Mailchimp email campaigns.
How to insert First Name in Mailchimp Email Content
Now that you have created merge tags for the first name of subscribers, you can use them to personalize the content of your Mailchimp email campaigns.
Use the following steps to insert first names into your email content:
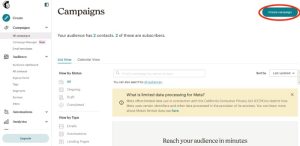
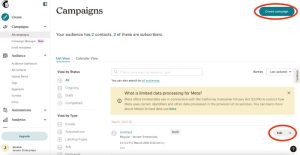
- The first step is to Create a new campaign in Mailchimp or open an existing campaign.
- Click on the Create campaign button or Edit button to access the email editor.
- Choose the content block where you want to insert the first name.
- Click on the merge tag drop down button
- Click on First Name.
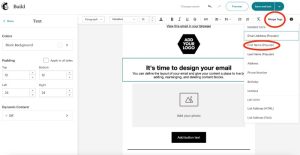
- You should see that the merge tag has already been added to your email template.

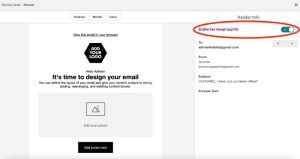
- Preview your email to ensure that the merge tag is working correctly. Click “Preview” button on top and then Click “Enable live merge tag info” radio button for Mailchimp’s Preview and Test mode to display the personalized content for a sample subscriber from your list.
- Save and send your email campaign to your subscribers.
Congratulations! You have now personalized the content of your Mailchimp email campaigns with the first name of your subscribers. By using merge tags to address your subscribers by name, you can create a more engaging and personalized email experience that will increase the effectiveness of your email marketing efforts.
Now let’s explore how to insert recipient’s first names into the subject line of your Mailchimp email campaigns.
How to insert First Name in Mailchimp Subject Line
Inserting first names into the subject line of your Mailchimp email marketing campaigns is one of the main ways to increase the personalization of your email content. Use the following steps to insert first names into your subject lines:
- The first step is to Create a new campaign in Mailchimp or open an existing campaign.
- Click on the Create campaign button or Edit button to access the email editor.
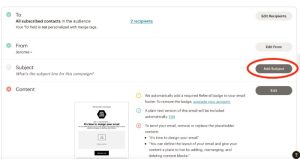
- Click on “Add subject line” or “Edit subject line”.
- Type in the text for your subject line, including the merge tag for the first name. For example, you might use the following subject line: “Hi |FNAME|, check out our latest offers!”
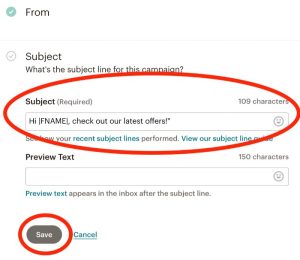
- Click save button
- Preview your email to ensure that the merge tag is working correctly. Click “Enable live merge tag info” radio button for Mailchimp’s Preview and Test mode to display the personalized content for a sample subscriber from your list.
- Save and send your email campaign to your subscribers.
By using merge tags to insert first names into your subject lines, you can make your email campaigns more engaging and relevant to your subscribers. Personalized subject lines can increase the open rate of your emails, as they catch the attention of your subscribers and make them more likely to click through and read the rest of your content.
It’s worth noting that while using first names in subject lines can be effective, it’s important to use this tactic thoughtfully and in moderation. Overuse of personalization can come across as insincere or manipulative, so be sure to balance personalized content with other strategies for engaging your subscribers.
Now that you know how to insert the first name of the subscriber into both the email content and subject lines of your Mailchimp campaigns, you can start experimenting with personalization and see how it impacts the effectiveness of your email marketing efforts.
Testing and Previewing Merge Tags
Before sending out your email campaigns with merge tags, it’s important to test and preview them to ensure that they are working as expected. Use the following steps to test and preview merge tags in Mailchimp:
- The first step is to Create or open an existing email campaign in Mailchimp.
- Click on the Preview located in the top right corner of the email editor.
- Click the “Enable live merge tag info” radio button for live preview.
- In the Preview Mode screen, select a subscriber from your email list to preview the email content with merge tags applied.
- Verify that the first name or other custom field is displaying correctly.
- If the merge tag isn’t working as expected, check that you have the correct merge tag syntax and that your audience list contains the necessary information.
- If you need to make changes to the merge tag or other email content, return to the email editor to make adjustments.
- Make sure you have included an unsubscribe link in your email campaign so that subscribers can opt-out of receiving future email campaigns from you.
- Once you are satisfied with the preview, you can either send a test email to yourself or other team members, or send the email campaign to your audience list. This is one of the best ways to ensure that there is no errors in your email campaign.
Testing and previewing your email campaigns with merge tags is an essential step in ensuring that your subscribers receive personalized and engaging content. By taking the time to verify that your merge tags are working as expected, you can avoid sending out emails with errors or broken tags, which can negatively impact your subscribers’ experience.
In addition to testing merge tags, it’s also a good idea to preview your email campaigns on different devices and email clients. This can help you ensure that your email content and formatting looks good on all types of devices, from desktop computers to mobile devices.
Overall, testing and previewing your merge tags and email campaigns is a crucial part of the email marketing process. By taking the time to verify that everything is working correctly, you can increase the effectiveness of your campaigns which will help improve the open and click rate of your email campaigns.
Advanced Techniques for Personalization
While inserting first names into email content and subject lines is a great start to personalizing your email campaigns, there are more advanced techniques you can use to take personalization to the next level. Here are some advanced techniques for personalizing your Mailchimp campaigns:
- Segmentation: One of the most powerful ways to personalize your email campaigns is by segmenting your audience based on their interests, behaviors, and demographics. With Mailchimp’s segmentation tools, you can create targeted campaigns for specific groups of subscribers, which can increase engagement and conversion rates.
- Dynamic Content: Mailchimp’s dynamic content feature allows you to show different content blocks to different segments of your audience based on their preferences, behavior, or location. For example, you could show different product recommendations based on a subscriber’s previous purchases or display different call-to-action buttons based on their geographic location.
- Personalized Product Recommendations: If you have an e-commerce store, you can use Mailchimp’s product recommendations feature to automatically suggest products to subscribers based on their browsing or purchase history. This can help increase sales and customer loyalty by showing subscribers products that are relevant and personalized to their interests.
- Personalized Promo Code, Coupons and Offers: Offering personalized promo code, discounts or coupons to subscribers can be a powerful way to increase engagement and conversions. With Mailchimp’s merge tags and automation features, you can create automated campaigns that deliver personalized discounts or offers to subscribers based on their behavior or preferences.
- Personalized Landing Pages: When a subscriber clicks on a link in your email, they will be taken to a landing page. By personalizing your landing pages with dynamic content or personalized product recommendations, you can create a seamless and personalized experience for subscribers, which can increase engagement and conversions. You can also take the opportunity to have signup forms on your landing pages which will help you collect contact information of people who are new to your website or those who are not yet in your address book.
Overall, personalization is a crucial aspect of effective email marketing, and there are many advanced techniques you can use to take personalization to the next level. By using segmentation, dynamic content, dynamic images, personalized product recommendations, personalized coupons and offers, and personalized landing pages, you can create a highly personalized experience for your subscribers that can increase engagement, conversions, and customer loyalty.
Best Practices for Using Merge Tags in Mailchimp
When it comes to using merge tags in Mailchimp, there are certain best practices that you should follow to ensure that your emails are personalized, effective, and professional. Here are some tips:
- Always test and preview your merge tags before sending: It’s important to make sure that your merge tags are working properly before you send your email. Use Mailchimp’s preview and testing tools to check that the merge tags are inserting the correct information.
- Don’t overdo it with personalization: While personalization can be effective, you don’t want to go overboard and make your emails feel creepy or spammy. Use merge tags strategically and sparingly, and make sure that the personalization adds value for the recipient.
- Segment your audience: To make your personalization even more effective, consider segmenting your audience based on their interests, location, or behavior. This allows you to tailor your content even more specifically to each recipient.
- Keep your data clean and up-to-date: Make sure that you have accurate and up-to-date information for each recipient, and that you’re only using merge tags for fields that you have data for. This will help prevent errors and ensure that your personalization is accurate.
- Use merge tags in a natural way: When you’re inserting merge tags into your content, make sure that they fit naturally into the sentence and don’t sound forced or awkward. This will make the personalization feel more authentic and less like a gimmick.
By following these best practices, you can use merge tags to personalize your Mailchimp emails in a way that feels professional, effective, and valuable for your audience.
Conclusion
In conclusion, personalization is an important aspect of effective email marketing, and using merge tags in Mailchimp can be a powerful tool for achieving this. By inserting first names into your email template and subject lines, you can create a more personalized experience for your audience and increase the likelihood that they will engage with your emails.
Creating merge tags in Mailchimp is a straightforward process, and with a little bit of testing and tweaking, you can ensure that your merge tags are working correctly and delivering the desired personalization. Additionally, by following best practices for using merge tags, such as testing and previewing before sending, segmenting your Mailchimp audience, and keeping your data clean, you can maximize the effectiveness of your personalization efforts.
Overall, by using merge tags to personalize your Mailchimp emails, you can create a more engaging, relevant, and valuable experience for your subscribers, which can lead to increased opens, clicks, and conversions. So give it a try and see how personalization can make a difference in your email marketing efforts.
But remember, personalization is not just about inserting first names into your emails. There are many other ways to use merge tags and other personalization techniques to create a more tailored experience for your subscribers. For example, you can use merge tags to include personalized product recommendations based on past purchases, or to send targeted content based on the subscriber’s location, interests, or behavior.
When using merge tags, it’s also important to keep your data clean and up-to-date, as inaccurate or outdated information can lead to incorrect personalization or even hurt your sender reputation. So be sure to regularly clean your list and remove any invalid or bounced email addresses.
Do not forget to add an unsubscribe link into your email campaign so that subscribers can opt-out of receiving future email campaigns. If you do not have an unsubscribe link in your email campaign, you may have the risk of subscribers marking your email campaign as spam which will hurt your domain and IP reputation greatly whereby your future email campaigns will end up in the spam folder for most of your subscribers.
In summary, using merge tags to personalize your Mailchimp emails is a powerful way to create a more engaging and effective email marketing campaign. By understanding the basics of merge tags, following best practices, and exploring advanced personalization techniques, you can create a truly personalized experience for your subscribers that drives results for your business.
Hope you enjoyed this blog post, and good luck!
Recent Comments